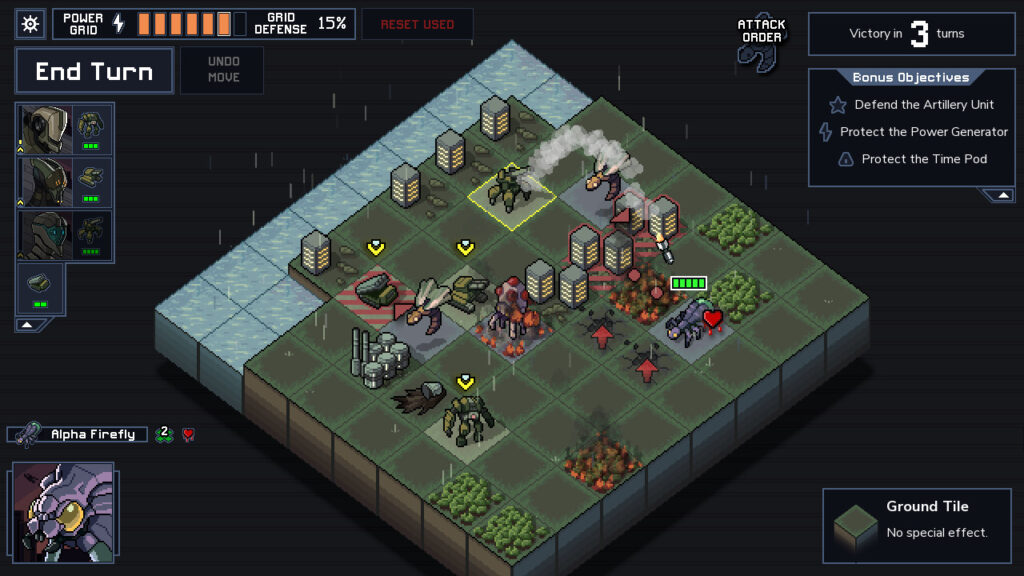
Into the Breach is a turn-based strategy game where you control three mechs to defend cities from underground monsters (the Vek) on an 8×8 grid. The core mechanic is “limited-information optimization”: each turn, all enemy attacks are telegraphed before they happen. Below is a complete beginner’s walkthrough for the first island of the game, using the Rift Walkers squad, which is available at the start of a new profile. This guide covers roughly the first four islands (each island has about 3-4 battles).
Starting Squad and Mech Setup
Choose the Rift Walkers. The three mechs in the squad are:
- Combat Mech (Prime Class): 3 base movement. Its weapon, Titan Fist, punches an adjacent tile, dealing 1 damage and pushing the target. It has an Armored trait which reduces weapon damage to this unit by 1.
- Cannon Mech (Brute Class): 3 base movement. Its weapon, Taurus Cannon, fires a projectile that deals 1 damage and pushes the target.
- Artillery Mech (Ranged Class): 3 base movement. Its weapon, Artemis Artillery, fires an artillery strike that deals 1 damage to the target tile and pushes adjacent tiles.
Core Strategy: Use push effects, displacement, and city buildings as buffers. Avoid direct slugging matches.
Island 1 (Grassland) Walkthrough
Battle 1: The enemies are two basic “Small” Vek (2 HP each) and a Hornet (1 HP, Flying, ignores obstacles). Initial positioning: Place the Combat Mech in the front center, the Artillery Mech on the back side, and the Cannon Mech on the opposite side. The Hornet will typically target a building; use the Artillery Mech’s rocket to knock the Hornet off its line or kill it. The Small Vek will move towards the mechs’ flanks; move the Combat Mech into their attack path to counter. Priority: Always protect buildings. Each building hit reduces your Grid Power by 1; if it hits 0, the run fails. After winning, pick an upgrade reward. I recommend the +2 Movement for the Artillery Mech or +1 Damage for the Combat Mech.
Battle 2: This map includes water tiles. Enemies that fall into water die instantly. You’ll face two Beetles (3 HP, charge in a straight line) and a Leaper (2 HP, can jump). Tactics: Use the Cannon Mech’s push to knock the Beetles into the water. The Leaper’s landing point has a shadow indicator. Use the Artillery Mech’s pull to drag it to the water’s edge, then have the Combat Mech knock it in. Remember to reserve a mech for standing on emerging Vek spawn points (standing on a spawn tile prevents an egg from hatching). Reward: Choose the Shield Generator (provides armor to adjacent friendly mechs).
Battle 3 (Boss Fight): The boss, a Beetle Leader, has 5 HP and summons one small Vek per turn. Key tip: Don’t focus on the boss first. Clear the smaller Vek before dealing significant damage to the leader. Use the Artillery Mech to push small Vek away from buildings. Once the adds are cleared, assault the Beetle Leader with the Combat Mech from the front. The Beetle Leader’s charge is a straight line covering 3 tiles; keep your mechs spread out to avoid being all hit at once. On the third turn, the boss will go into a “rage” mode, doubling its damage. Finish it off by the fifth turn. Rewards: One Reactor Core (upgrade your Combat Mech’s damage) and a new weapon. Pick the Smoke Grenade weapon, which deploys a cloud of smoke, disabling enemies inside it from attacking next turn.
Island 2 (Desert) Walkthrough
The desert map features Sandstorms that randomly push all units (both yours and Vek) one tile in a random direction at the end of each turn. The new enemy type is the Firefly, which shoots projectiles in a straight line. By this point, your Combat Mech deals 3 damage, and your Artillery Mech has 5 movement. Boss Fight: A Scorpion Leader. The Scorpion Leader webs adjacent targets; its webs cannot be broken easily. To beat it, you need at least two mechs to block its movement. By the end of Island 2, your squad should have at least 3 Reactor Cores installed, and your Grid Power should be above 3.
Islands 3-4 & Final Battle
Island 3 (Ice Map): Watch out for ice tiles. Walking on them makes your mechs slide uncontrollably. You need to plan movement allowances for sliding.
Island 4 (Volcanic Map): Enemies are greatly enhanced. Use the Smoke Grenade weapon extensively to block Vek spawn tiles.
Final Battle: The last island consists of three consecutive battles with no rest or repair between them. Before entering the final island, ensure all three of your mechs have at least 4 HP each. The final boss does not require direct damage. Instead, you must use your three mechs’ displacement abilities to push the massive boss into a crack in the edge of the map.
Following this walkthrough will give any beginner a solid chance to complete their first timeline. The key thing to always remember: before ending your turn, spend at least 30 seconds watching all of the Vek’s attack indicators. Prioritize threats that will target buildings, then threats that will hatch new eggs, and only then calculate damage.