

Shop, Map, and Inventory Systems Explained Crimson Desert’s game system is somewhat complex, and there’s a lot to learn. To help you overcome this challenge, we’ve compiled practical early game tips for Crimson Desert, including an analysis of the shop, map, inventory, and other systems to help you get started quickly.
1.Initial Loading Instructions A slight lag during the initial game launch due to the time tunnel is normal and part of the shader compilation process. Please wait a few minutes; this is not a bug.

2.Core Status Bar Analysis The left side of the minimap displays the experience bar, accumulated by defeating enemies. Once full, you can claim an Abyss artifact (skill points). The right side displays the temperature bar, which fluctuates with the ambient temperature. Exceeding the suitable range will accelerate stamina depletion, and extreme temperatures will trigger severe limitations. These can be mitigated by equipping resistance gear or consuming resistance-enhancing foods.
3.Beginner’s Guide to Town After landing, prioritize exploring shops marked with question marks on the map. Check their items and accept notice board quests to quickly familiarize yourself with town functions.
4.Notice Board Quest Rules The notice board under the large tree in town allows you to accept villager requests and wanted quests. A purple icon will appear on the minimap when a new quest is available.
5.Inn and Healing Items The inn sells cooking recipes and dishes. Unknown items require hovering the cursor over to display their names. There are no health potions in the game; you need to stock up on healing foods to restore health. More recipes will be unlocked through subsequent quests.
6.Equipment Crafting and Upgrading: The equipment shop sells weapon crafting recipes, and the blacksmith shop next door allows you to craft and upgrade equipment. Completing the blacksmith shop quest “Turnar’s Request” unlocks the tempering upgrade function.
7.Butcher Shop and Recipe Acquisition: Accept the notice board faction quest “Laine’s Request,” talk to the butcher shop NPC to receive the fish porridge cooking recipe, and check your inventory to unlock it.
8.Key Operation for Viewing Items: After acquiring most items, you need to manually open your inventory to view details; otherwise, you may get stuck on quests.
9.Campfire Cooking Tips: You can cook dishes at the campfire next to the butcher shop. Homemade dishes are more effective than ordinary food. There are no health potions in the game, so you need to stock up on healing dishes. Activated campfires will be marked on the map for later use.
10.Backpack Expansion Method: The initial backpack capacity is limited. Completing main and side quests will automatically expand the capacity; prioritize quests that indicate expansion rewards. After arriving at Wolf Hill, you can use the storage space inside your tent to store items.
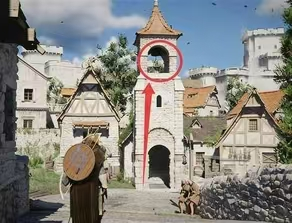
11.Map Unlocking Method: Climb the town’s clock tower and ring the bell to dispel the fog and unlock the map area. Each area has a corresponding clock tower, functioning similarly to a watchtower.
12.Resurrection Item Usage: Collect glowing Tranquilizer Pills while exploring. Upon death, you will immediately revive and recover 30% of your health. It’s recommended to revive at designated resurrection points unless absolutely necessary, as this will fully restore your health.
13.Crafting Tool Usage: Tools such as pickaxes, axes, and brooms can be equipped via the weapon wheel or by switching between them in the inventory. Before using any tool, aim at the corresponding target (ore, trees, etc.).
14.Backpack Organization Tips: The “Item Personalization/Cataloging” function at the bottom of the inventory allows you to categorize and merge similar items (such as crafting tools). This only optimizes layout and doesn’t save space. Used documents and recipes take up a lot of space; it’s recommended to sell them to free up space.
15.How to Enter Hernand Castle
Complete the main quest “A Test of Kindness – Lend a Helping Hand Without Hesitation,” and help Alan clean the chimney with a broom to obtain the Hernand Banquet Attire. It can also be purchased at the clothing shop next to the blacksmith. Only by wearing this attire will the guards allow entry to the castle.
16.Contribution Shop
Accumulate contribution points through exploration and completing quests. These can be exchanged for various special equipment at the Contribution Shop.
17.Exploration Challenges
Exploration challenges often require collecting Abyssal artifacts (skill points). The relevant items are usually located near the quest area; pay attention to find them.
18.Gliding Flight
Gliding is possible, but it consumes a lot of stamina. It is recommended to freefall first, then glide to slow down and land. Not controlling direction in the air will result in a slow descent without consuming stamina. To extend gliding time, allocate points to stamina in the skill tree.
19.Handling Useless Quest Items
After completing a quest, the background color of key items will change from purple to gray, indicating they are no longer usable. These items cannot be sold and must be manually discarded to save inventory space.
20.Lantern Function
The lantern provides illumination and can also reveal hidden content on the map. It can be toggled on/off at the weapon dial; when set to automatic, it will automatically light up at night or in dark environments.
21.Exploration and Finding Teleport Points
It’s recommended to keep the lantern on while exploring. Observe from high places or open areas; glowing points are often important collectibles or teleport points. You can also use your sword to reflect light. Standing on Abyss Marks will activate teleport points; activated Abyss Marks can also be used for teleportation. Large white question marks on the map often indicate teleport point locations; you can also use Sky Island teleport points for fast travel.
22.Abyss Artifacts
There are three types of Abyss-related items in the game:
Abyss Artifacts: Skill Points, obtainable through combat, quests, and challenges.
Faded Abyss Artifacts: Used to reset skill points; the number equals the number of resets.
Sealed Abyss Artifacts: Requires exploration to collect; can be found by holding a lantern or sword; marked in purple on the minimap. Each corresponds to a specific challenge; completing it unlocks skill points or Abyss Gears (used for equipment socketing).
23.Wanted Fugitive Capture
Accept wanted missions at the Guard Headquarters west of Hernand City. Capturing Jeffrey will reward you with a mask essential for thievery. More wanted posters can be found at streetlights inside and outside town, indicated by purple icons on the minimap. Some wanted fugitives require searching or waiting nearby; it’s recommended to sneak around them during the capture, as killing them will prevent you from completing the mission.
24.Re-enforcing Missions
If a mission objective is lost or needs to be retried, you can rest at a campfire or bed, or leave the area and return; the objective will reset. Campfires and beds are available in towns and Wolf Hill.
25.Theft Gameplay
Complete Jeffrey’s missions or purchase a mask from the alleyway merchant. Wearing the mask is required to steal. Some items require aiming with a light before stealing. Stealing will create a search area; leave the red circle as soon as possible for safety. For indoor thefts, it’s recommended to wait for the countdown to end before venturing out. Being discovered will result in a bounty; excessively high bounties will lead to pursuit by guards. Confessing after arrest will remove the wanted status.
26.Livestock Selling: Stolen cattle, sheep, pigs, chickens, ducks, and other livestock can be exchanged for gold coins at the Livestock Selling Merchant in the southeast of Hernand City.
27.Alley Merchant: The Alley Merchant next to the Livestock Selling Merchant sells special items such as house keys, prison keys, masks, lapis lazuli, advanced fishing rod recipes, disguise clothing, and Abyss gears.
28.Infiltrating Houses: Locked or guarded houses can be entered by climbing through windows, or keys can be purchased from the Alley Merchant to open doors.
29.Fishing: A fishing rod can be obtained by completing the faction quest “Ambella’s Request.” Switch fishing rods at the weapon roulette, cast in a rock-free area, and reel in the fish. When the fish struggles, pull the rod in the opposite direction to consume stamina and avoid breaking the line; reel in the fish quickly after it is exhausted.
- Memory Fragments: When wearing the Bigion Sensing Helmet, a blue light from the lantern indicates the presence of a memory fragment nearby. Shine the lantern for a period of time to obtain it, and use the helmet to play the corresponding memory.
31.Pet Acquisition: Petting cats and dogs increases affection. Once affection reaches 100, the pet can be tamed and will automatically help pick up items.
32.Early Game Combat Tips: Familiarize yourself with combat skills in the skill tree first, then practice in open areas before actual combat. When surrounded by multiple enemies, create distance and defeat them one by one once they are dispersed. Use the shield to block effectively. If you are not yet proficient, focus on offense and use strong attacks to quickly kill unarmored enemies. Successful kills will also knock back surrounding enemies. Retreat to recover stamina when it is depleted.


This game is really fun, and the walkthrough was a huge help to me.
Thank you for your support, I hope this proves helpful to you.