
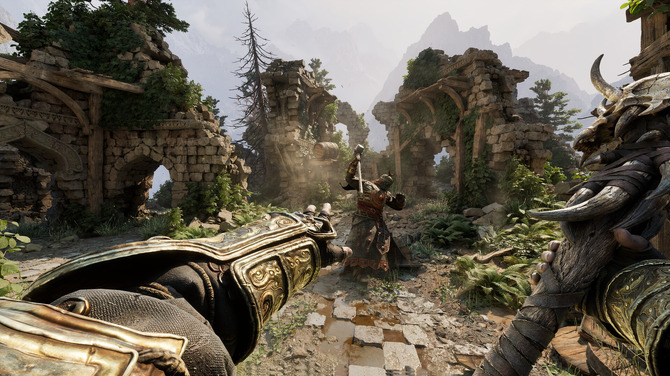
Developed by Paraglacial and published by THQ Nordic, the first-person action RPG Fatekeeper will launch in Early Access on Steam on June 2, 2026. Based on the trailers and gameplay showcases released so far, this title presents a temperament best described as a “modern reimagining of old-school hardcore RPGs”: it possesses the immersive quality of freely exploring a handcrafted world reminiscent of The Elder Scrolls series, while its combat system incorporates physics-based interactions and environmental utilisation similar to Dark Messiah of Might and Magic, all built atop a deep progression mechanic that extends far beyond superficial numerical increases. For the first wave of players about to dive into Early Access, the following content covers a complete onboarding strategy, including attribute allocation, combat tactics, equipment selection, and exploration pacing.

The Multi-Dimensional Progression System: Balancing Specialisation and Versatility
Fatekeeper does not feature a traditional “class” system. You will not tick a box labelled “Warrior” or “Mage” at the start and be locked into that path. Instead, you gradually define your own combat style through the free allocation of attribute points, the selection of weapon types, and the study of spell schools. The developers describe the core of the progression system as “making meaningful choices” — every decision you make opens some paths while closing others.
For attribute allocation, a ratio of “70% specialisation plus 30% versatility” is a well-tested and safe strategy. For example, if you choose Strength as your primary attribute (investing approximately 70% of your points), it is recommended to allocate the remaining 30% to light armour defence and basic healing spells. This configuration allows you to maintain the high damage output characteristic of heavy weapons while also possessing a minimum level of self-preservation when suddenly surrounded at close range. Similarly, if you choose Sorcery as your primary attribute, you should at least unlock the basic “Weapon Block” skill to avoid being helpless when a high-agility enemy closes the distance. Attribute point allocation does not exist in isolation — every point directly influences what weapons you can equip: Strength-oriented characters are suited for two-handed axes (which require meeting a strength threshold to wield fluidly), Dexterity-oriented characters are better matched with dual-wielded short swords (which benefit from significant attack speed bonuses), while Sorcery-oriented characters need to prioritise unlocking higher-level spell slots.
Beyond basic attributes, the choice of spell school also influences the direction of your character’s growth. The game offers multiple spell schools for dedicated study — the Arcane school leans toward direct damage output, the Nature school focuses on crowd control and recovery, and the Shadow school specialises in weakening and curses. These three schools are not mutually exclusive, but skill points and spell slots are extremely limited. It is recommended to choose one primary school as your core during the early game, supplemented by a secondary school for functional support. During the initial phase of Early Access, a combination of Arcane and Nature achieves a good balance between area-clearing efficiency and survivability: Arcane handles mob clearing and burst damage, while Nature provides sustain and emergency recovery.
Combat Logic: Observation, Guarding, and Precise Counterattacks
The official description of the combat system emphasises that it “demands both skill and preparation.” Enemies are divided into common mobs and boss-level units known as Fate Guardians — each boss possesses an independent attack pattern and weakness mechanic, requiring observation, trial-and-error, and tactical adjustment rather than mindless rolling and attacking.
Stamina management is the most fundamental yet most easily overlooked aspect of combat. Unlike many titles in the same genre, the health system in Fatekeeper does not encourage overwhelming enemies with a relentless hail of blows. Instead, players should rely more on dodging and blocking, especially triggering a precise defence at the very last moment before an attack lands. For newcomers, a practical starting strategy is: when facing an unfamiliar enemy, refrain from proactively attacking. First, maintain a guarding stance and observe the enemy’s attack pattern — most common enemies have an attack cycle consisting of no more than three moves. Once you have memorised them all, perform a single light attack test during the brief recovery window after an enemy attack, confirm the window length, and then gradually increase your damage output.
Different types of enemies require different response strategies. When facing large demon-type enemies, pay attention to their pre-attack tells — a raised arm usually signals an impending swing, at which point you should dodge-roll laterally to attack the legs (the weak point); consecutive hits to this area can cause the enemy to fall. When facing agile beasts, do not actively chase them. Instead, adopt a defensive stance to lure their pounce, and at the exact moment they land and enter a recovery animation, use a short sword to perform a precise thrust (aiming for the head can trigger critical hits).
Environmental interaction is an easily overlooked but highly effective dimension of the combat system. When an enemy has their back to a rock wall, you can use a Force Push-type spell to slam them against the wall for additional stun damage. In the narrow corridors of underground crypts, polearms suffer reduced attack speed due to spatial constraints; switching to a one-handed hammer paired with a shield can instead improve both survivability and damage output. The game’s destructible environmental objects — from loose stone pillars to stacked explosive barrels — can all be utilised during combat to deal area-of-effect damage or alter the terrain. Developing the habit of scanning the surrounding environment before every encounter can often allow you to neutralise high-threat targets with minimal resource expenditure.
Equipment System and Durability Management
The equipment system of Fatekeeper follows a “contextual association” principle: loot is not randomly dropped, but is deeply tied to the enemy types and environmental characteristics of the region where it is found. Enemies in forest regions are more likely to drop Antidote Armour Shards (used to counter beast venom), treasure chests in underground crypts often contain Shadow-type spell scrolls (used to counter undead creatures), and boss rewards in temples have a high probability of containing Relic Slots that can be socketed with enhancement gems. This means exploration needs to be goal-oriented — if your next plan is to challenge a temple boss, you should prioritise clearing crypts to collect Shadow-type scrolls as preparation; if you plan to venture deep into the forest, you need to farm beasts in advance to accumulate anti-venom materials.
The durability system also requires continuous attention. Strength-based weapons degrade faster when striking rock-type enemies, while the sharpness of dexterity-based weapons affects their ability to penetrate leather armour. It is recommended to regularly repair and upgrade your equipment at camp or with NPCs to avoid being caught in a passive situation due to weapon breakage at a critical moment.
Exploration Rhythm and Danger Gradients
Although Fatekeeper features a tightly paced linear main story as its core, the world itself reserves ample space for exploration. From ancient battlefields, vast underground caverns, and serene forests to crumbling sanctuaries lost to the ravages of time, every area hides a wealth of concealed lore, forgotten relics, and unexpected encounters. For players who enjoy digging into worldbuilding and hidden content, the moments spent deviating from the main path to meticulously search every corner are often the most rewarding.
It is recommended to plan your exploration order according to danger gradients: the low-level beasts on the outskirts of the forest are best suited for familiarising yourself with combat controls and accumulating basic equipment. The undead enemies in the shallow crypts drop Soul Shards, which can be used to unlock your first spell slot. The elite monsters in the forest core drop Specialised Attribute Trinkets, which serve as the key stepping stone for boosting combat power in the mid-game. Advancing in this rhythm ensures steady improvement in character strength while preventing repeated frustration from blindly charging into high-danger zones. During the Early Access phase, this progression strategy is particularly important — the game’s content ceiling and balance are still being adjusted, and entering late-game areas prematurely may expose you to enemy data that has not yet been fully tuned.
During the Early Access period, the developers have confirmed that they will gradually expand the main story content, add new explorable regions, and introduce more enemy types and equipment options. For players who join at launch, the Early Access phase is the ideal window for establishing a solid character foundation — mastering the core combat rhythm before the full scope of content is rolled out will ensure that the new challenges brought by subsequent updates do not catch you off guard.