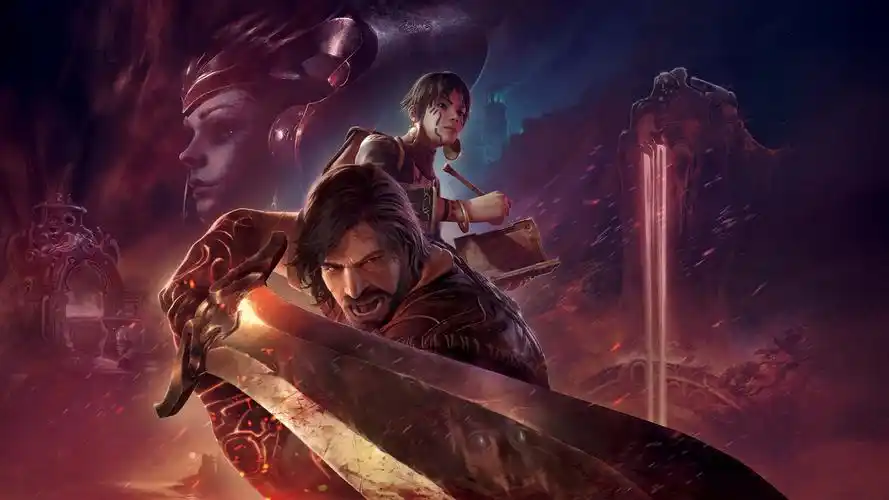
Developed by MercurySteam, Blades of Fire launched on the Epic Games Store and consoles in 2025, and arrived on Steam on May 14, 2026. Described by multiple outlets as “the most underrated Soulslike of 2025,” the Steam release came bundled with a substantial content update. Players assume the role of Aran de Lira, a blacksmith’s son who embarks on a deicide quest under the guidance of Queen Nerea. The game’s defining feature is a remarkably distinctive weapon forging system, paired with a Stance-switching mechanic deeply integrated into combat. The following guide breaks down everything from core systems to boss encounters, arranged in the order a new player would encounter them.
Skip the Preset Weapons: An Introduction to Custom Forging
The biggest shock Blades of Fire delivers to newcomers occurs roughly two minutes in — instead of offering a choice between sword, axe, or spear, the game throws you directly into the forging interface and expects you to craft a weapon with your own hands.
The forging interface determines the final weapon’s properties through four variables: Material (Iron, Bronze, Meteorite, etc.), Length, Balance Point, and Cross-Section Shape. Material determines base attack power and durability. Length affects attack range and speed. A forward balance point yields higher damage but slower swings, while a rearward balance produces the opposite. Cross-section shape influences the proportion of Slash, Pierce, and Blunt damage types the weapon deals.
The most common mistake newcomers make is attempting to forge an all-purpose weapon right away, ending up with a compromise in every dimension and a weapon that fails to excel at any damage type. The correct approach is to settle on a style before setting parameters. If you favour a heavy playstyle, go for a long-hafted heavy weapon: shift the balance point forward, choose a thick rhomboid cross-section, and rely on charged heavy attacks throughout. If you prefer an agile playstyle, go for a short-hafted curved blade: shift the balance point rearward, choose a flat cross-section, and pair it with counterattacks after dodging. For material, Iron (referred to in-game as “Base Metal”) is recommended as the starting foundation. It does not suffer from the low durability of Bronze, nor is it as rare as Meteorite — making it the most cost-effective choice for the early game.
One easily overlooked detail is that different parts of the same weapon can be sharpened independently. After forging is complete, you can use the workbench to sharpen the edge, spine, and grip separately. Edge sharpness increases slash damage but reduces durability. Spine reinforcement improves defensive properties but adds weight. Grip adjustments affect attack speed and combo fluidity. The depth of this system can easily consume dozens of hours in fine-tuning, but during the early game, only one principle matters: do not chase perfection. A weapon with solid base stats and a comfortable feel will serve you far better for progression than one min-maxed into extreme specialisation. Extreme weapons are a pursuit for when resources are plentiful in the late game; the early game demands something that is simply good enough.
Stance Switching: Breaking Down the Core Combat Mechanic
Blades of Fire‘s combat system revolves around two Stance slots: Iron Stance and Flame Stance. You can switch between the two preset stances at any time using the left and right directional inputs. Each stance can be bound to a different weapon, a different combat art, and a different passive effect. In practice, Iron Stance is typically used for defense and guard counters — bind a weapon configuration with high defensive stats to this stance, and use it with the guard-triggered Iron Wall Counter for the most stable rhythm when pushing through areas. Flame Stance is typically used for burst damage — bind a weapon configuration with high attack stats, and use it with the charged heavy attack that triggers Flame Burst Combo to deliver high burst damage when a boss is knocked down.
The greatest advantage of stance switching lies in how it exploits the enemy Poise system. Every enemy in the game has a hidden Poise gauge. Sustained attacks gradually deplete this gauge, and when it reaches zero, the enemy enters a knockdown state. The catch is that consecutive attacks from the same stance suffer diminishing returns on Poise depletion. This forces the player to switch frequently between the two stances. First, use Iron Stance to guard and parry, stabilising the situation. Then switch to Flame Stance to break the enemy’s defensive rhythm. Once Flame Stance has drained the Poise gauge and the enemy is knocked down, switch back to Iron Stance to finish them off, and repeat the cycle. Many newcomers grow accustomed to using a single stance from start to finish, which often results in an inability to control the pace of combat effectively, dragging fights out far longer than necessary. The correct cycle is: Iron Stance guard and parry → Flame Stance Poise break → switch back to Iron Stance to finish → repeat.
The way combat arts are bound also deserves attention. Each stance slot can equip one active combat art and one passive effect, and the choice of combat art should serve that stance’s role. Iron Stance should prioritise defensive combat arts (such as Iron Wall Counter), while Flame Stance should prioritise offensive combat arts (such as Flame Impact). Passive effects follow the same logic: Iron Stance takes Steadfast (reduces recovery time after a guard), while Flame Stance takes Frenzy (damage gradually increases during consecutive attacks).
Steam Edition Additions
The version that landed on Steam on May 14, 2026, brought a significant content update, primarily including a new Boss Challenge Mode — which allows players to rematch previously defeated bosses, removing the original one-and-done limitation — multiple new difficulty options, which lower the barrier while also offering a steeper challenge for hardcore players, and new bosses and content expansions. For returning players who have already cleared the game on other platforms, Challenge Mode is the ideal entry point for rediscovering the core combat experience. For new players, starting on Normal difficulty to learn the mechanics before working up through the harder tiers is the recommended path.
It is worth noting that the Stance Switching system has divided opinion within the Soulslike community. Some players feel the mechanic adds meaningful depth to combat pacing, while others argue that the switching operation introduces unnecessary complexity during high-pressure boss fights. Whichever side one takes, the mechanic itself undeniably constitutes the clearest point of differentiation between Blades of Fire and other Soulslike titles on the market. New players are advised to spend time in the first two stages repeatedly practising stance-switching timing, and to build up muscle memory before pushing further into the main story — this will save a great deal of time that would otherwise be spent re-adapting later.
Boss Order for a First Playthrough
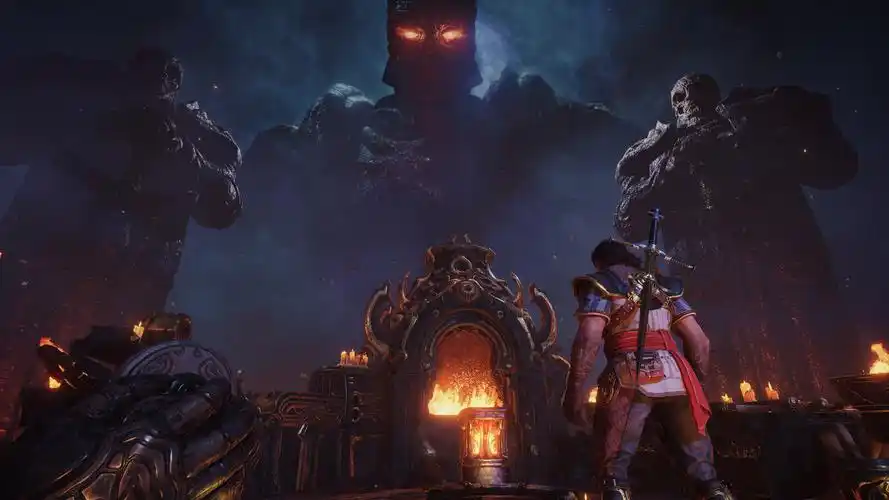
Bosses in the game fall broadly into three categories: humanoid warrior types, giant creature types, and multi-phase types. Humanoid warrior types (such as the Betrayer Knight in the prologue) serve as practice targets for the stance-switching mechanic. The basic strategy is to slowly whittle down health with Iron Stance guard counters, and when the enemy’s Poise gauge is nearly depleted, switch to Flame Stance for burst damage — do not get greedy with extra hits. Giant creature types (such as the Molten Giant in Chapter 2) cannot be dealt with through guard counters. The basic strategy is to fight a hit-and-run battle with high-damage Flame Stance weapons — rush in to deliver a combo during the window after a boss attack, then immediately roll out of range. Do not rely on blocking. Multi-phase types (such as the God-King in the final chapter) switch attack patterns and elemental weaknesses between phases, demanding that the player switch weapon configurations and stance combinations for each phase. When facing such a boss for the first time, it is recommended to treat the first attempt as a scouting run — observe when and how the boss transitions between phases, take note of the attack pattern changes, then reload, adjust weapon configurations, and return.
The recommended order for pushing through the main story is: Prologue → Iron City → Marshlands → Volcano → Sky Temple → Final Chapter. After defeating the boss in each area, sweep back through to ensure your weapon forging level keeps pace with main story progression. A special note: the Volcano region contains abundant Meteorite veins, the only location in the game where the highest-tier forging material can be reliably obtained. It is advisable to set aside time to collect a full round of Meteorite once you enter the Volcano, and upgrade your primary weapon to Meteorite material in preparation for the final boss fight.